Use the Web Factory ImagEditor's Area menu and Area Toolbar to resize a scanned photograph, freehand drawn image, or images that you have downloaded from the Internet. You can also cut out or crop parts of an image to save as a new image or object.
- To resize an image:
- Select Resize Image from the Area menu.
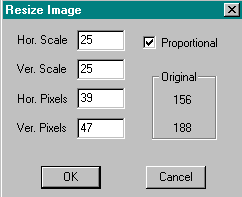
The Resize Image box is displayed.
 |
 |
| This image is reduced to 25% of the original size. |  |
- Resize by percent or pixels.
If you have Proportional checked, as you reduce or increase one of the coordinates the other coordinates re-adjust automatically. - Click OK.
The resized image is displayed.
- To crop an image:
- Click on the Drag box
 or Drag freehand
 button on the Area Toolbar.
The Drag box button places a dotted rectangular box around the area; the Drag Freehand button outlines the area . Click on the right mouse button to end the selection.
- Select the area by clicking on the image.
Hold the left mouse button down and drag until the dotted lines surrounds the area.
- Select Crop Selected Image from the Area menu.
The area is copied into a new image window. - Save the window as either an object or new image file
- To save the image window as an image file:
-
Click the Save button
 on the Standard toolbar.
Or, click on Save on the File menu.
The Save As box is displayed.
- Accept the name or assign a new image name and location for the file.
Web Factory assigns a default image name and location.

Note | The default image name begins with WebImage1.JPG. Each page is numbered sequentially (WebImage2.JPG, WebImage3.JPG, etc.) as you save more images. The default extension is *.jpg. The default location is the Web Factory "Program" directory. |
- Click on the drop down icon in the Save As Type field to select the file type to use.
The formats available are BMP, EPS, JPG, GIF (interlaced .gif and transparent .gif), PCX, TGA,TIF. - Click on the drop down icon in the Number of colors to Save with field to select either Millions of colors or 256 colors.
- Click on Save to return to the image.

Note | Always use the Save As Type field to select the file type. If you type the image file name and extension and leave the Save As Type field at a different file type, the file is not saved in the correct format. |
- To save the image window as an object:
- Click on the Drag box
 or Drag freehand
 button on the Area Toolbar to select the image area.
Dotted lines surround the area. - Select Grab Object from the Area menu.
The Describe Object box is displayed.
- Type in a description of the object.
- Click OK to return to the image.
- Select Object from the File menu.
- Select Save from the sub menu.
The Save Object box is displayed. - Type in a file name.
The Save As Type default extension is *.imi. - Click on the Save button to return to the image.
- Select Close from the File menu to clear the screen.
You are asked if you want to save the changes to the image file. - Click No.
When you save the object (the *.imi file) it is saved as a separate entity. It does not become part of the image file. Only select Yes if you have made other changes to the original image.
This Web page created in Web Factory.


 or Drag freehand
 button on the Area Toolbar.
 on the Standard toolbar.

 or Drag freehand
 button on the Area Toolbar to select the image area.

